


Above Everywhere are licensed & insured aerial video & photography specialists. Utilising remote-controlled quadcopters / multi-rotor UAVs / drones.
In December 2015 Above Barbados were approached with the request to fly the Freedom 360 virtual reality filming rig. The rig, while becoming popular, is not supported by the Inspire with any form of mount or interface so it was going to be challenging to accomplish.
Ever eager to fulfil and exceed client expectations, we set about testing...
Mounting the Rig - Version 1
The Freedom 360 rig has a single mounting point (can be either 3/8 or 1/4). The rig itself weighs just over 600g, for reference, the Inspire 1 camera and gimbal is just over 200g. So right off the bat, it's going to be flying over 3x the weight it's used to.
There is no off-the-shelf mount or gimbal for the camera rig so we left the Inspire camera and gimbal off the unit (it would interfere with the shot and mounting while also adding unnecessary extra weight) and mounted the rig behind the normal gimbal position - this placed the mount reasonably central (although slightly forward to counter the rearward weight of the Inspire's battery) while also utilising the Inspire's rubber dampers to reduce any vibration through the camera rig. A cable tie was mounted for safety to ensure that if the rubber dampers gave way, all was not lost.
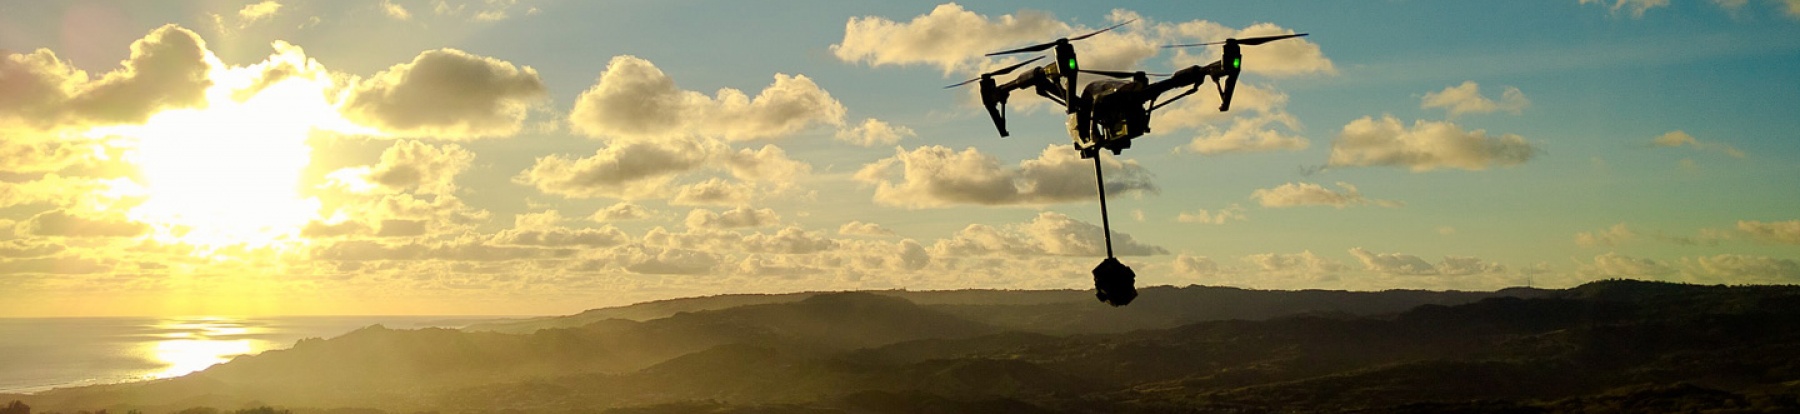
One of the keys to good 360 virtual reality shots is to mount the camera rig as far from the body as possible. We mounted the camera block using metal camera extension rods to get the rig about 50cm from the Inspire (see Pic 1).
1st Test Flight.
Immediately various things became apparent. The first obvious one - how do you launch? With the camera rig dangling 0.5m below the Inspire it was impossible to use the landing legs. We considered building a frame to launch from but settled on just raising the landing gear and holding the battery to launch (the camera rig itself helping to steady things).
However, the landing gear will automatically lower when it is close to ground - or thinks it is. The camera rig itself would trigger the landing gear due to its bulk (likely the sonic sensors bouncing off the 6 GoPros dangling below).
Thankfully, there is an option with the latest Inspire firmware to disable the automated landing gear lowering. While helpful, it's not absolute - the gear will still lower when it thinks it is about to imminently land. The solution to this is to tape over one of the sonic sensors (see Pic 2) - this disables the automatic lowering of the landing gear enabling you to hand launch and catch (see pic 3). The only time the gear will now lower is when it is doing an emergency forced landing when the battery hits 15%.
With this problem solved, the flight went ahead. The Inspire copes well with the weight, but with an obvious performance hit. Care has to be taken for no sharp movements/sudden stops as the pendulum effect of the weight dangling half a metre below kicks the unit to some high angles.
With the Inspire having to work harder to carry the load, the flight time reduced from ~20mins to ~8mins on a T47 battery.
2nd Test Flight
After the 1st flight it was obvious that there was too much movement in the rig - it was essentially swinging freely. We added further cable ties to tighten up and reduce the allowed movement and launched again.
Reducing the movement completely of the damped plate saw a harmonic error pop up in the app so it was clear this was not the solution.
Mounting the Rig - Version 2
To reduce the weight that the Inspire had to carry we replaced all the metal rod joints with a single carbon rod. A rubber washer was placed in the mounting hole and then holes were drilled through the rod to allow tethering of the rod to each landing arm (see Pic 4 and Pic 5).
Further Test Flights
After some experimentation with tethering tightness, it was found that simple fishing wire (25lb test) tied reasonably tight allowed enough movement to damp out any harmonic warnings but was stable enough to reduce any free swinging of the camera rig.
It was very important to be slow and smooth when flying as the pendulum effect would exaggerate any movements which would likely result in motion sickness inducing footage! With the camera rig tightly tethered, any change in pitch on the aerial rig is reflected and multiplied at the end of the mounting rod.
Ideally it is good to run another separate GoPro camera pointing straight up on the top of the Inspire to allow you to capture the sky for stitching into the final cut. However, we found mounting a GoPro on top (the ideal position is directly above the GPS puck sensor) in some cases cut the GPS satellites completely (ie. to zero, forcing ATTI), or, at best, reduced the overall number. This was the case even when mounting further back towards the battery. Regardless, with the landing gear up, a significant portion of that GoPro's view would still have been props spinning.
To resolve this, we would run a separate static GoPro vertically on the ground, from the highest position accessible to us at the time.
Flying the rig
The rig would take 30-60s to settle (akin to the old Phantom settle time) as though it 'learns' how to cope with the extra weight and then decides it's happy, however, it would still take occasional dips and rises as it tried to cope with the extra weight.
The reduced flight time (down to ~10mins on a T48 battery in mild winds) means careful planning is required. The Inspire gives a reduced performance power to motors warning around 35-40% but this has little effect on actual flying as you are trying to fly as smoothly as possible regardless.
ATTI mode helps with the smoothness somewhat, especially if your planned shot is able to drift with the wind. The bottom line is to be as light and smooth as possible, with special care paid when starting and stopping a movement as any movement in the Inspire is exaggerated vastly due to the pendulum hanging beneath it.
As ever, catch landing can take a little longer to land meaning we were bringing home flights, on average, around the 40% battery mark, 50% if fighting back into the wind.
Although you lose your FPV/camera view, it's far less important as you're running a 360 camera so shot framing isn't as essential. You still retain your telemetry of course (although the camera rig was causing some strange height readings so rely on flying by sight).
Depending how far out you're flying, get acquainted with the homelock orientation flying mode as this will make your job a lot easier should you lose your orientation, along with a few practices of the emergency return to home feature - retaking control so you can catch land safely.
Final Thoughts
Well, it can be done, that's proven and the Inspire coped admirably, but it's surpassing the load I'd be comfortable flying on it regularly. So while it's okay for the occasional job/one-off, if planning to fly the Freedom 360 camera rig regularly I would be looking to carry it on a larger aerial platform, or, to get a smaller 360 setup.
Either way, an interesting experience and further shows the flexibility and capability of the Inspire platform.
See the shots from the shoot and the final video here.
Links
http://www.abovebarbados.com/recent-aerial-work/360-virtual-reality-aeri... - Write up of the shoot
http://www.dji.com/product/inspire-1 - the Inspire aerial rig
http://freedom360.us/ - the 360 camera rig
http://www.nytimes.com/newsgraphics/2015/nytvr/ - VR example videos


